Scene and Road
|
Navigation Links |
Purpose / Aim
The purpose of the scene and road inspection is to collect information that describes the accident scene location, such as the roadway characteristics and traffic conditions. It is vital to have a thorough understanding of the accident event, the scenario leading to the accident and any causation factors in order to better conduct the overall investigation. A well conducted Scene and Road investigation can reveal much of this information.
The Scene and Road inspection attempts to collect accident scene related information which is required to subsequently fully code the accident case in the database. This information includes:
- Photographs of the accident scene, roadside, approach and accident traces (see: Photo Routine)
- Create a detailed sketch of the accident scene (see: Scene and Road Sketch)
- General road information (i.e. road type, historical and accident traffic conditions, speed limits, physical road characteristics,etc.)
- Description of Vulnerable Road User facilities (i.e. pedestrian and cycle crossings, bicycle lane, kerb height, etc.)
- Road area features (i.e. road components: barrier, lane, road side, etc.)
- Identification and description of any collision objects (i.e. animal, building, sign post, etc.)
Methods
Scene and Road inspections can be conducted on scene or retrospectively. Much of the on scene data to be collected may only be available for a finite period (due to accident site cleanup, etc.). Where possible, accident investigators should make efforts to collect any on scene data that may not remain indefinitely (i.e. pedestrian swipe marks, vehicular accident debris, etc.).
The Scene and Road methodology is divided into On Scene and Retrospective as the methodology used to conduct these two investigations differ. Despite these differences, it is important to understand that most data required for an accident analysis can be collected on scene, depending on time constraints, obviating the requirement for a retrospective investigation.
AS MUCH ON SCENE EVIDENCE SHOULD BE COLLECTED AS POSSIBLE.
The methods outlined within this section should be applied in conjunction with relevant Detailed Methodology sections.
On Scene
The On Scene investigation is the collection of scene and road related evidence at the accident scene location, with a focus on the collection of evidence that may only be available for a finite period. Therefore, accident investigators should make efforts to arrive on-scene as soon as possible after receiving an accident alarm.
The methodology for the On Scene investigation has been divided into the following steps:
1. Pre-Departure Preparations
After receiving an accident alarm, the investigation team should ensure they have all necessary investigation equipment (see here: Equipment List) and fulfilled all Health and Safety requirements.
2. Arrival On Scene
Once arriving on scene, the investigation team should meet the requirements of the Arrival on Scene and Scene Safety Health and Safety section to ensure a safe working environment.
After meeting the above stated health and safety requirements, the investigation team should identify all those involved in the accident (i.e. all road users and accident witnesses), those involved in the rescue process (i.e. ambulance and police services) and any other relevant parties (i.e. tow truck driver). These individuals can provide the accident team with relevant information and better enable the overall scene and road investigation process.
From speaking with the relevant authorities, the investigation team should determine the length of time the vehicles will be available on scene and a description of any changes made to the vehicles in the rescue and cleanup process.
3. Scene and Road Photographs
Photographic evidence of the accident scene and road should be recorded. The detailed methodology for this process is described in the Photo Routine section.
By following the Photo Routine methodology (as above), investigators should have photographic evidence that will enable the creation of a general description of the accident scene and allow for a detailed reconstruction and investigation. This includes: the accident vehicles, any temporary sight restrictions/visibility obstructions (i.e. parked vehicle(s), temporary signs, weather conditions, glare source(s), etc.), the infrastructure and environment, etc.
4. Transient Evidence
Some key scene and road evidence may only be available for a finite period and may not be available during subsequent retrospective investigations. Therefore, accident investigators should collect records of this evidence as soon as possible.
Examples of transient evidence to be collected include: vehicle positioning, traces (pedestrian traces, vehicular fluids, skid/brake marks), debris, collision objects, etc.
The majority of the transient evidence should be collected by following the above stated Photo Routine methodology.
5. Additional Evidence
All additional evidence (that which is not considered transient) can usually be collected retrospectively, therefore the detailed methodology for completing the vehicle inspection is detailed below in the Retrospective section. Although, it should be noted that ideally all evidence should be collected on scene, if time allows.
Retrospective
It is preferential for the scene and road evidence collection to be made on-scene, as much evidence is lost during the accident scene rescue, towing and cleaning processes. Depending on a variety of factors, it is possible to perform sections of the investigation retrospectively. Although it should be noted that the majority of evidence collected can and should be collected during the on-scene scene and road investigation, where possible. Therefore, the following methodology can be followed during an on-scene investigation if time allows.
Any retrospective accident scene site inspection should be conducted as soon as possible to retain as much evidence as possible, as much of the transient evidence may no longer be available over an elapsed time.
During a retrospective investigation, it is important to remain open-minded, even if the investigation team already has been provided a sequence of events (e.g. do not be limited by the police search as the retrospective investigation can reveal missed information).
1. Pre-Departure Preparations
Before departing for the retrospective scene and road accident site visit, the investigation team should ensure they have all necessary investigation equipment (see here: Equipment List) and fulfilled all Health and Safety requirements.
To enable an efficient retrospective investigation, it is important to collect as much relevant information as possible on the sequence of events before attending the accident scene site inspection as this may focus the investigation area and facilitate an overall better understanding of the accident event before arriving on scene.
It is also important to procure detailed information on the position of the accident. If the scene has been cleaned and the vehicle(s) towed, with little remaining evidence of an accident, it may be difficult to determine where to take road measurements if no exact position is given.
The following points are important to consider whenever undertaking a retrospective investigation:
- Communicate details of the planned inspection with police and road authorities in advance;
- Prepare the route to the crash scene in advance;
- Collect data about the crash scene and the direct environment: police data, maps, Google Earth and Streetview, internet and news sites. Take this data to the crash scene;
- Develop potential accident scenarios and determine the information required to evaluate these scenarios;
- Forecase potential issues beforehand and attempt to mitigate appropriately (e.g. doubts about the driving directions of the vehicles, the exact crash location, etc.).
- Based on the available information, determine the safety work zone at the crash scene.
To determine relevant accident information, use sources such as online media websites that publish news items within hours (or less) of the initial accident occurence. The text of these articles often contain detailed information about the accident (e.g. driving direction, driver(s) and passengers (including statements of the driver(s) and/or witnesses), injuries, car damage, objects struck, etc.). The articles often have pictures with information about car (brand and type), damage, end position, objects struck, emergency services at the site, etc.
Please see the figures below for examples of accident information found on relevant websites.
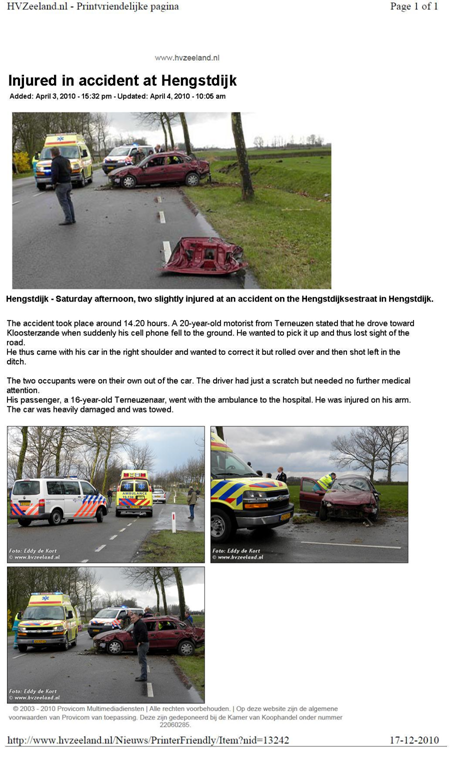
Figure 1: Example media website information (published within 1 hour of accident occurence)
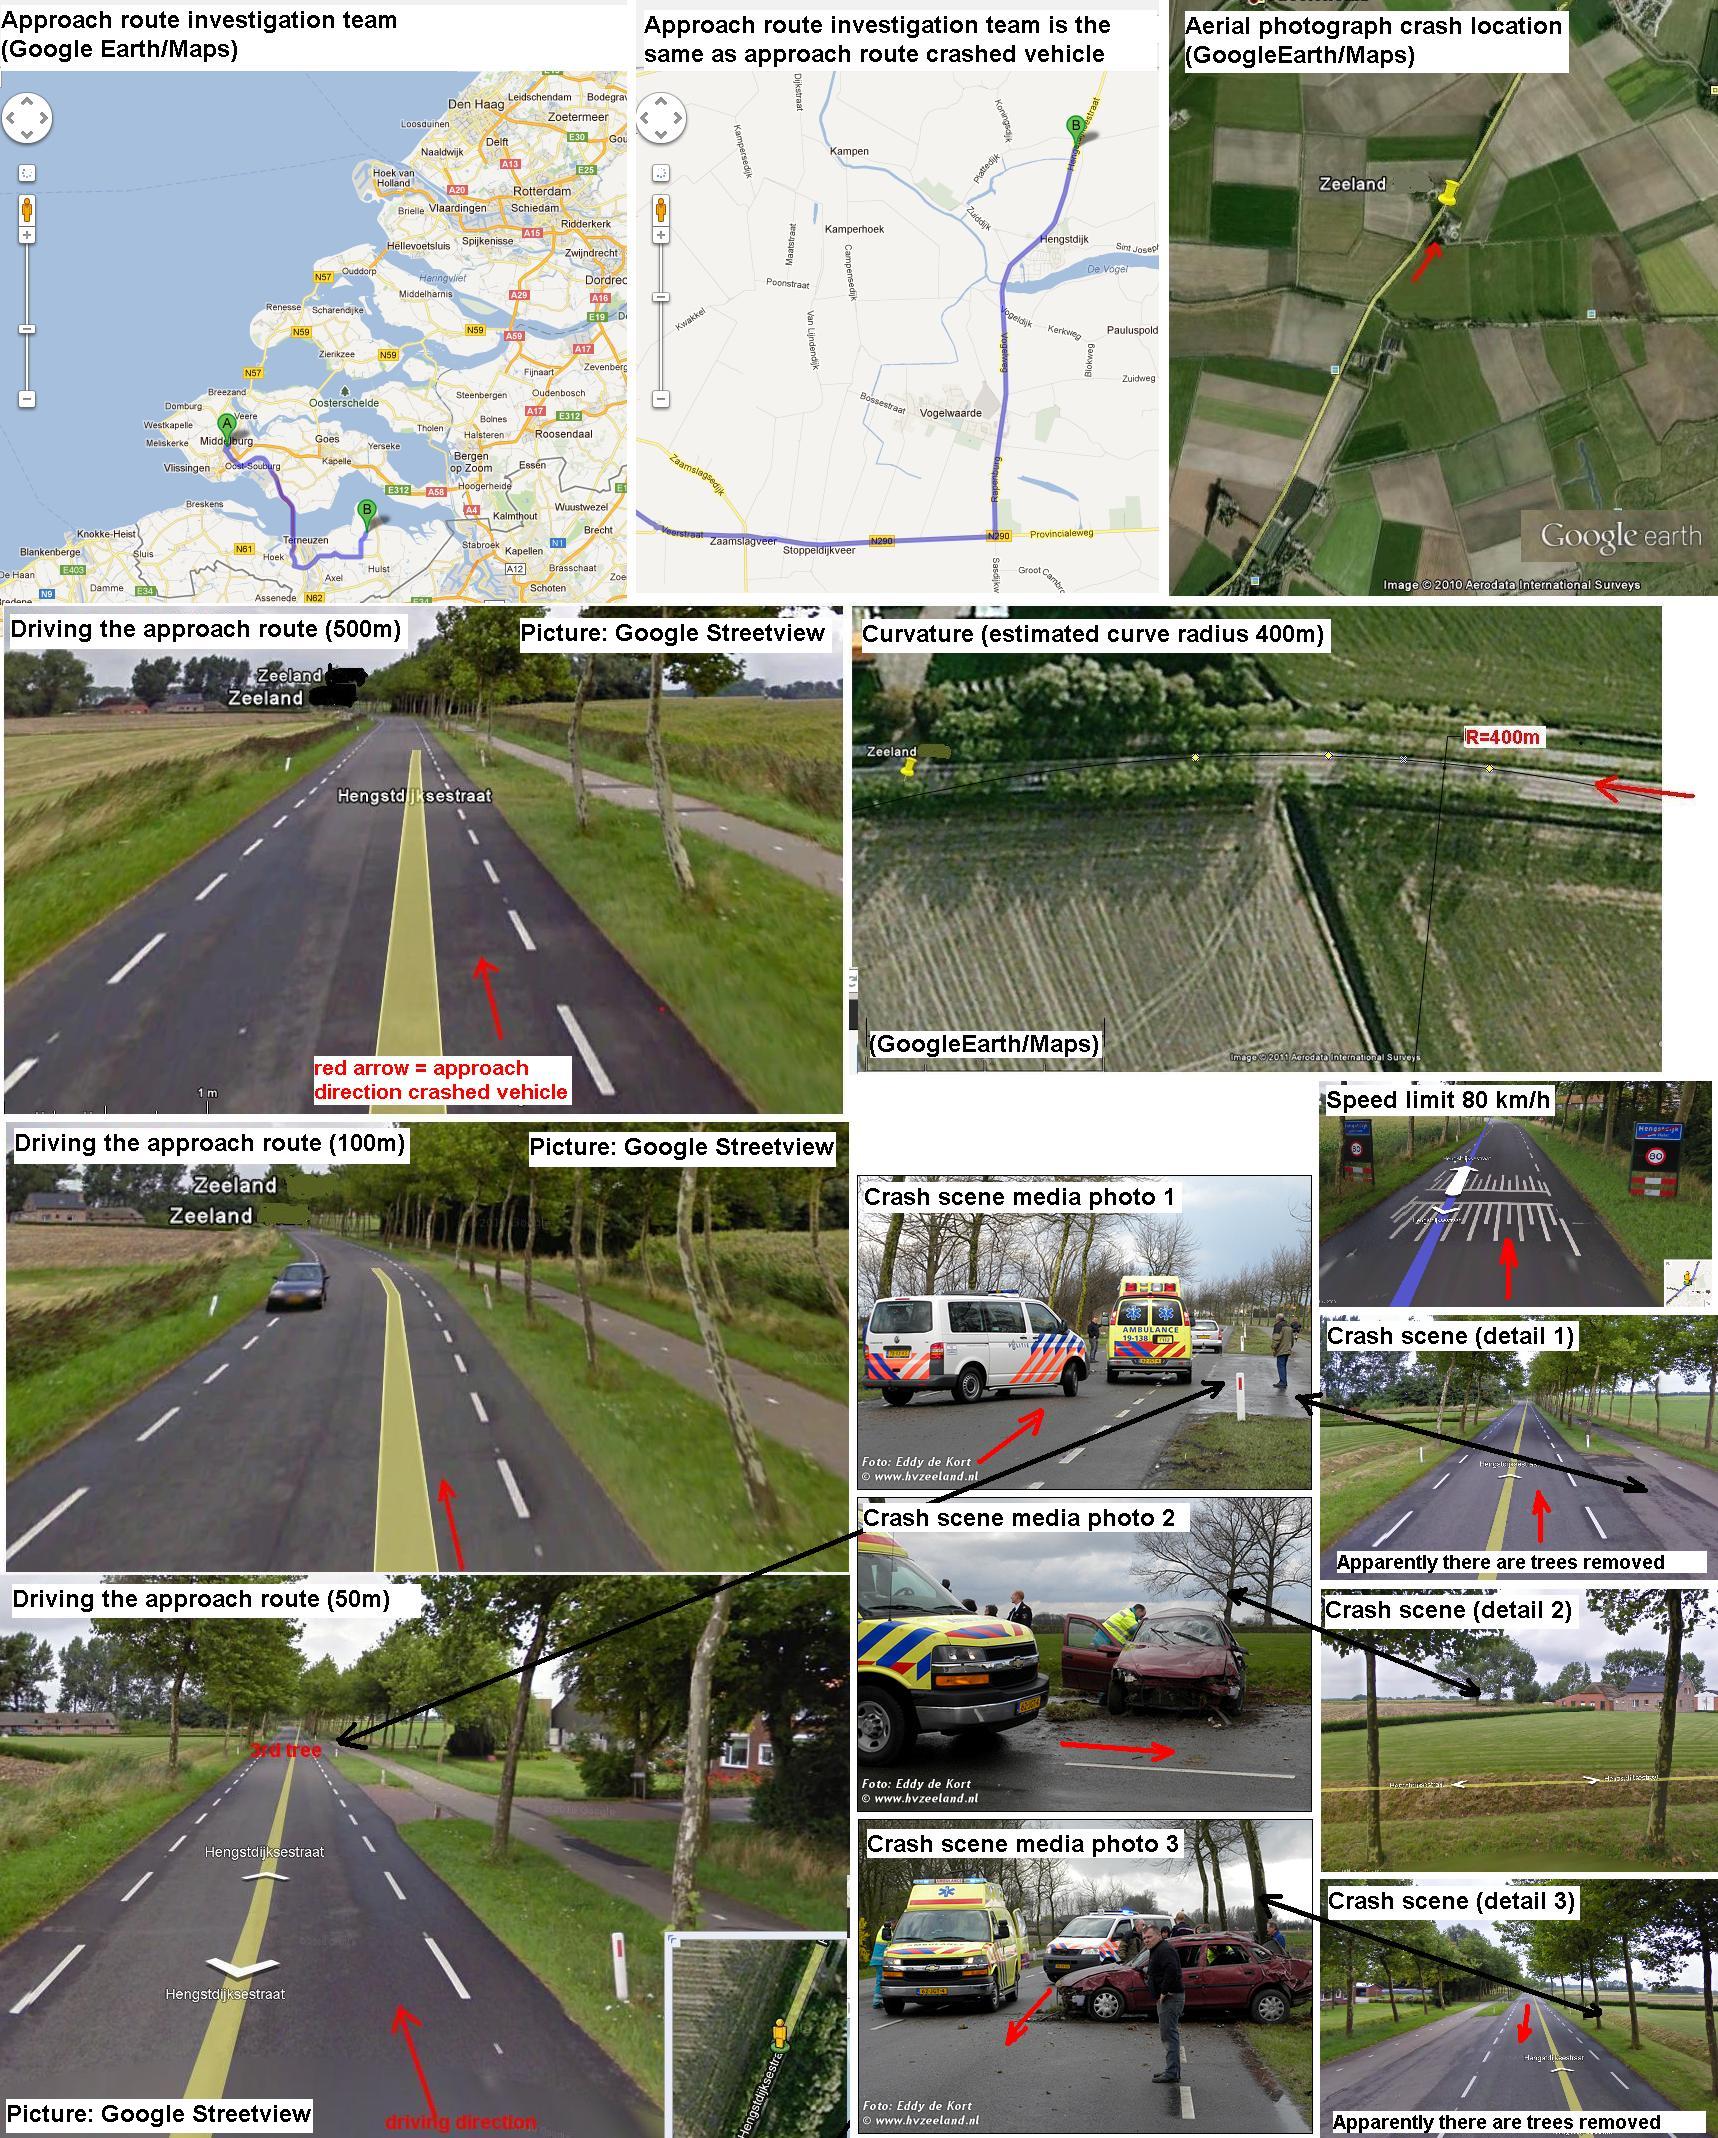
Figure 2: Example information from (GoogleEarth/Maps) maps, aerial photographs, digital pictures (GoogleStreetview) of situation before crash (including pictures of the accident scene from media website)
Furthermore, it is possible to use information from (local) police, emergency services, and scrapyards. This information is usually available within some days (or less) after the initial accident occurence.
Additionally, Google Earth/Maps or other up to date maps can be used to get information about the appoach route, surrounding land use, curvature, speed limits, etc. Google Streetview or other up to date pictures can be used to get detailed information about the carriageway and roadside (note: always confirm this information during the site visit), surrounding land use, sightlines (stop and sight distances), street furniture, etc.
See the figure below for an example of approach route information that can be found on Google Earth/Maps.
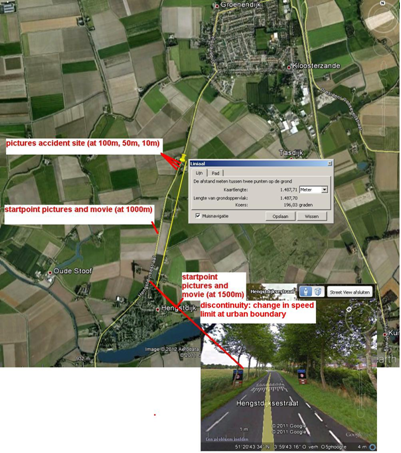
Figure 3: Information about the approach route form Google Earth/Maps and marked points at which the site inspector should begin recording photographs and/or movies
Use Google Streetview or other up-to-date and digital pictures to get information about the available space for creating a work zone in which the crash site could be inspected in a safe way and according to the local guidelines or legislation. Contact the police or road authorities in advance, to notify them of the upcoming inspection.
See the figure below to see an example of marking a work zone at an accident site using Google Streetview photographs.

Figure 4: Information about the crash scene (pictures Google Streetview) and marked work zone in which the site inspector should inspect the crash scene in a save way and according the local guidelines (twe work zones for both driving directions of the carriage way and roadsides)
2. Retrospective Accident Scene Arrival
Once arriving on scene, the investigation team should meet the requirements of the Arrival on Scene and Scene Safety Health and Safety section to ensure a safe working environment.
After meeting the above stated health and safety requirements, the investigation team can begin the retrospective investigation evidence collection process.
3. Retrospective Scene and Road Visual Evidence
The majority of evidence collected will be in the form of photographic records. Any evidence that was not collected during the on-scene (if any) investigation should be collected during the retrospective accident scene site visit.
Photographic evidence of the accident scene and road should be recorded. The detailed methodology for this process is described in the Photo Routine section.
By following the Photo Routine methodology (as above), investigators should have photographic evidence that will enable the creation of a general description of the accident scene. This includes: the roadway and approach, the infrastructure and environment, etc.
Furthermore, creating a video record of the last 1000 (or minimum 500 metres) of the vehicle route(s) should be made. This video evidence should give investigators the road user perspective shortly before the accident and the expectations during the approach to the crash site. To this end, the following characteritics should be recorded:
- Vertical and horizontal alignment;
- Consistency of the presence of curves and bends shields;
- Pavement type and quality of pavements;
- Type and condition of axis marking;
- Type of direction separation and / or median;
- Type and position of any parallel (moped and/or) bicycle facilities;
- Presence of sorting strips, parallel roads, slip lanes, hard shoulders and parking facilities;
- Any changes from a previous road section;
- Presence of pedestrian crossing facility;
- Presence and consistency of traffic inhibitors (speed humps, speed tables);
- Presence of light towers, reflector posts and hectometer poles;
- Description of the environment and the presence of trees and shrubs;
- Traffic signs along the route (including text-boards and any possible problems with the performance or visibility).
4. Cross Section Measurements
In performing cross section measurements, it is important that one investigator measures the cross section and take pictures, while the other investigator keeps an eye on the traffic.
Cross-sectional measurements should be taken (at minimum) at:
- Vehicle conflict point
- Any location where the vehicle(s) had a run of road
- Final resting points of the vehicle(s)
A laser distance meter with tilt sensor (digital inclinometer) can be used to measure road characteristics on the road surface or in the roadside from out of a work zone in the verge at a safe distance of moving traffic. If the inspection vehicle can be parked in the shoulder of the roadway or on a cycle lane, measruements can be carried out without having to block a traffic lane. The laser meter with tilt sensor can also be used to measure angles of cross fall (slope of road surface), slopes of embankments or cuts, etc.
The following road characteristics of the cross section should be collected:
- Road category (residential road (Zone30), rural access road (Zone60), distribution road (80 km/h) or flow road (A-level road), motorway 100/120 km/h));
- Lane configuration (eg, 2x1 or 2x2);
- Speed limit on site;
- Road situation on the spot (intersection / road section; straight / bend);
- Radius if the crash occurred in or behind a curve;
- Width of the pavement, edging and lanes of driving strip;
- Width and type of axis marking, separation of driving directions and other marking and lines;
- Type and width of hard shoulder, semi-hardening, widths of obstacle-free zone, safety-/ breakdown zone, and roadside vegetation free zone, type of (rigid) obstacles, connection with the pavement;
- Type of cut or embankment, slope (degrees) and width to crown and toe line,
- Type and width of any devices in parallel and the width and material of the intermediate berms.
If a safe site inspection is not possible with the available safety equipment, for example on a 100km/h-road, only filming the road will be possible and additional measurements have to be carried out using estimations based on GoogleEarth and Streetview. The radii of curves can also be determined using GoogleEarth.
5. Back at Office
After returning to the office, it is important to properly compile the evidence collected during the investigation. This can be facilitated through:
- Inserting a minimum set of variables into the database without delay enabling other team members to continue working on the case
- Creating a scale plan using appropriate software (see: Scene and Road Sketch)
- Checking the quality of the data and entering the full data into the database
- Removing any vehicle identifiers (i.e. license plate numbers, etc.) and sorting/uploading the photos
Equipment
Please refer to the main Equipment List for the Scene and Road equipment list.
Arrangements
Please refer to the Arrangements section of the Methodology Outline Scene and Road section.